Announcement

Collapse
No announcement yet.

Bobs 1st 3D Project

Collapse
X
 
  • Filter
  • Time
  • Show
Clear All
new posts

  • #16
    So I spoke too soon on the ABS. My first few things had no problems but now I am starting to see some warped prints. I am gong to have to put a box around the printer as Tom suggested (thanks Tom). It must be temperature because I know that when I first started printing it was hotter, the room the printer is in has no AC so it tends to follow the temps of outdoors to some degree. If it gets hotter outside so does the room or colder the same. Well it has gotten significantly colder the last few days and then the warping started.

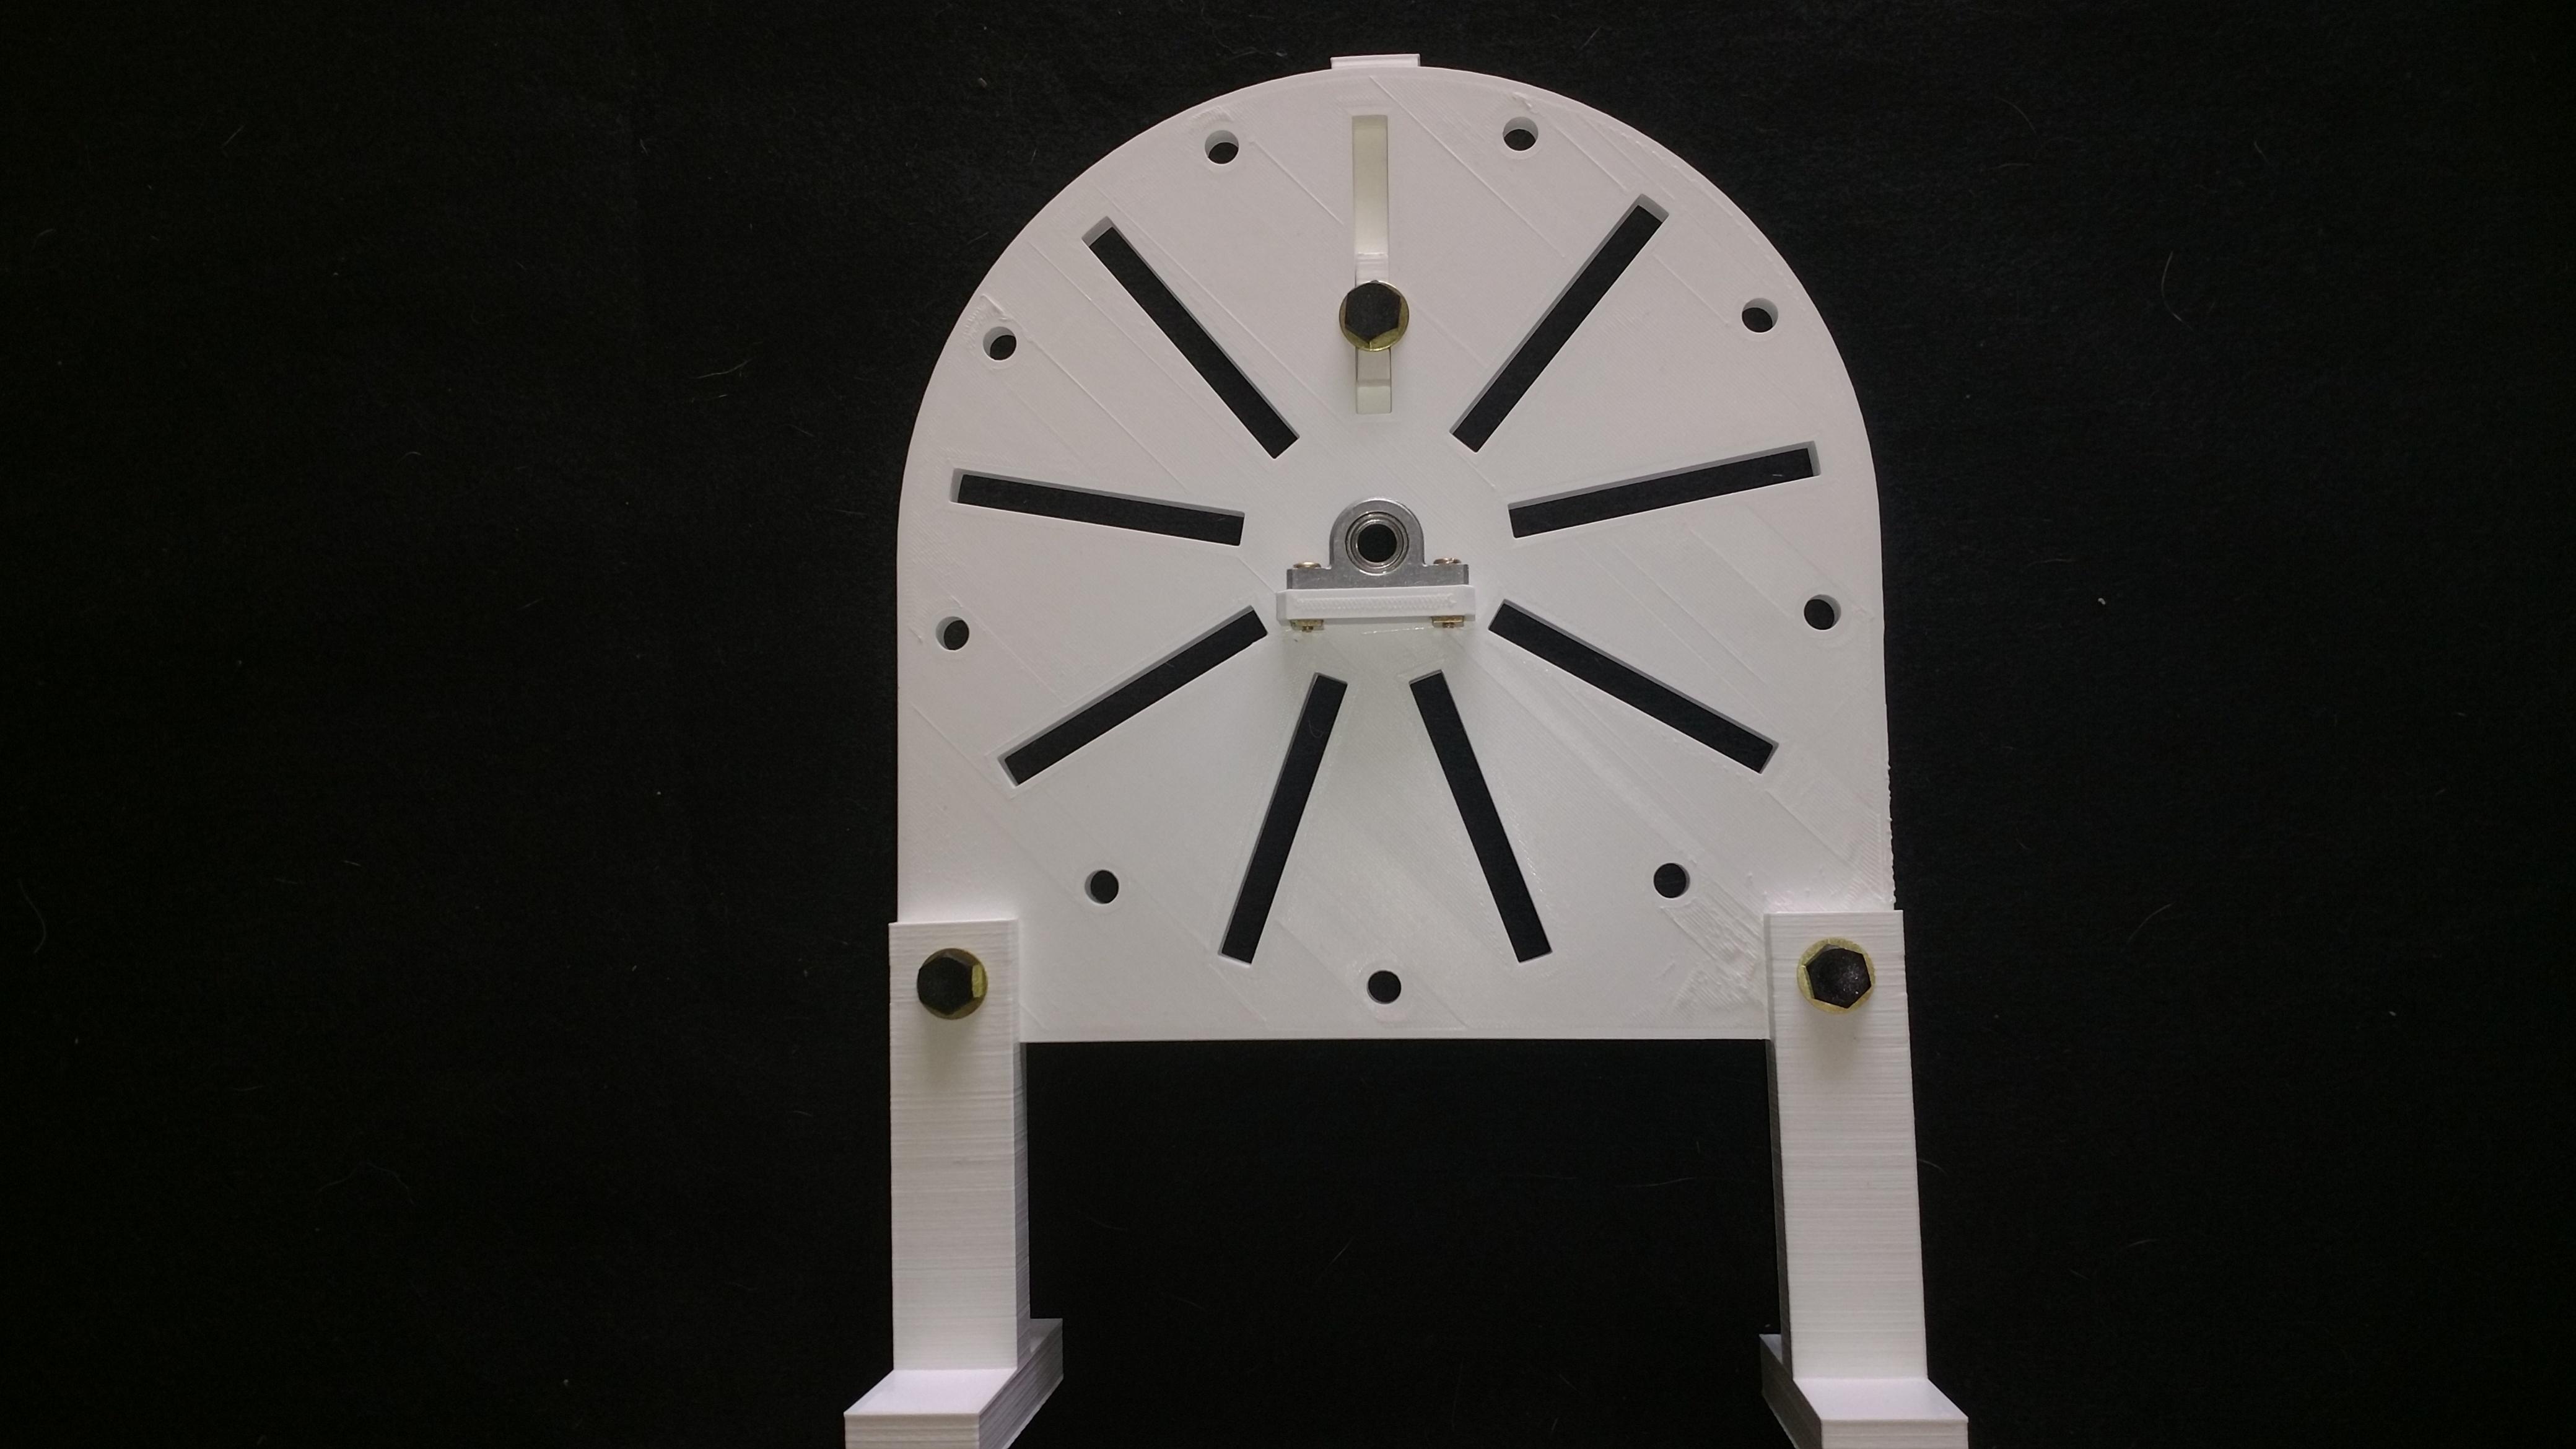
    Over all things are going pretty good with the project. The holes all line up so far and have clearance for the bolts. They may be a hair too large but I think I will leave them so that later on if someone trys a print on a different model that maybe prints a little different tolerance than mine it should still work. By the time you tighten the bolts up it makes no difference really, there is a little play but not much adn when tightened up it is fine.

    Click image for larger version

Name:	BZ-Frame-1stPrint-front.jpg
Views:	1
Size:	554.3 KB
ID:	49445

    Click image for larger version

Name:	BZ-Frame-1stPrint-back.jpg
Views:	1
Size:	490.1 KB
ID:	49446

    Comment


    • #17
      A little update here:
      I tried some PETG clear on some legs and frames and WOW is this stuff awesome!

      I don't think I am ever going back to ABS, I mean it was cool but this stuff is very tough and prints very nice. It sticks to the bed really well for me and I haven't had one peel up at all. Take a look at these new prints. I don't think I have enough to do the whole kit with this same spool so I am going to do the coil holders and supports in a different PETG that I have on order.

      Click image for larger version

Name:	BZ-FRAME2-PETG.jpg
Views:	1
Size:	539.2 KB
ID:	49447

      Comment


      • #18
        Originally posted by BobZilla View Post
        A little update here:
        I tried some PETG clear on some legs and frames and WOW is this stuff awesome!

        I don't think I am ever going back to ABS, I mean it was cool but this stuff is very tough and prints very nice. It sticks to the bed really well for me and I haven't had one peel up at all. Take a look at these new prints. I don't think I have enough to do the whole kit with this same spool so I am going to do the coil holders and supports in a different PETG that I have on order.

        [ATTACH=CONFIG]6250[/ATTACH]
        Hey Bob
        Very nice, i like the design.
        Could you please place something next to it for a size reference, when you have time.

        Comment


        • #19
          Petg is nice.... looks like your default settings were pretty spot on. my E3D V6 nozzle on my rostock id not like the PETG, I hav ento tried it on my robo or flashforge yet. my DaVinci is supposedly great with PETG, wo knows... I have a few spools laying around for a work project. looking forward to your finished build!!


          Well Done!!
          Tom C


          experimental Kits, chargers and solar trackers

          Comment


          • #20
            Originally posted by Tom C View Post
            Petg is nice.... looks like your default settings were pretty spot on. my E3D V6 nozzle on my rostock id not like the PETG, I hav ento tried it on my robo or flashforge yet. my DaVinci is supposedly great with PETG, wo knows... I have a few spools laying around for a work project. looking forward to your finished build!!


            Well Done!!
            Tom C
            Thanks Tom.

            It is interesting that you say your nozzle doesn't like it, my printer uses the same nozzle (.4) brass. This clear spool is Prusa brand from them, they compt me a spool because of some order issues. I wonder if other brands will work as well as this does since you say you have not had the best experience with it. I have some petg coming from Maker Geek that I got on a bundle discount offer and I also have some Hatchbox brand coming. We will be able to see if other brands do as well on my setup as the clear did.

            The prusa edition of slic3r I am using does have pre-configured settings for my printer for various materials which I didn't mess with other than increasing shells and bottom/top layers and the fill density. The temp was 230 on first layer and 240 for the rest on the extruder and 85 on first and 90 for the rest on the bed. The print settings were on NORMAL .20mm profile.

            Comment


            • #21
              Bob,

              as with most things its never simple. with printer nozzles its really no the orifice size itself, it has more to do with the cartridge heater, the heat break, the design of the inside of the path for the hot material. In my case I could not get the nozzle to work correctly, in spite of the retract settings, temp, flow etc, no matter what I tried the minute it was retracting lifting and moving the heatbreak area in the nozzle would clog. my hexagon hotend on my robo likes it just fine, but the E3D no way..

              Tom C


              experimental Kits, chargers and solar trackers

              Comment


              • #22
                I hear you Tom, there is a lot I have to learn. I took the fast path and bought my first one pre assembled but eventually I will have to do maintenance on it and learn more about it as a machine.

                I have a hardened steel version of that tip too but so far I have only used the brass one that came on it. I got that one to try out graphite mixes or maybe some of the metal flake filament. When I ordered my printer I also ordered the 4 material upgrade kit. They are starting to send those out in about 2 weeks. One practical thing I can think of too do with the multi material is to make timing marks on a wheel, built right in you know perfect spacing. I'm printing a wheel tonight for the machine but just in white.

                So I got the Hatchbox petg and it also works pretty good. Below are some support rods and end caps for them. The rod was one print and the caps another and then I glued the caps on with gorilla hot glue.

                The machine is coming together nicely. I have a wheel on tonight and then I need to do all the coils and holders. I'm doing the whole thing in petg, I had some ABS stuff printed already but I want to keep it all the same material. The ABS stinks a bit too where the petg doesn't.

                Click image for larger version

Name:	BZ-RODS.jpg
Views:	1
Size:	852.7 KB
ID:	49448

                Click image for larger version

Name:	BZ-Rods-n-frame.jpg
Views:	1
Size:	504.6 KB
ID:	49449

                Comment


                • #23
                  Just a quick update here.

                  I have changed the bearing setup on the frame. I was mounting the bearings today and the ones I had originally chosen were just not very good. I could barley get the axle through them and it didn't spin very well either. I have ordered a different set that mounts sideways with bolts, same style I have always used on my larger machines. So I had to modify the frame to take off the little ledge I had on there for the other bearing mount and put new holes. I re did the whole piece in fusion and made the holes a little closer tolerance.

                  I had another setback with the printer too. When I was trying to get the wheel off the bed it was stuck on really good and it pulled up a patch of the film on the bed along with it. Now I have a nasty patch dead smack in the middle of my bed. I have been printing smaller parts off to the side for now and have ordered a new film to put on the bed.

                  I also tried slicing with Cura instead and at least for the parts I tried I like it better. The supports are not as hard to get off and clean up as with slic3r.

                  Another design change for the better is the coil mount. I tried printing it all one piece and it works nicely that way. The arms will bend out slightly allowing for a spool to be slid into place so I think I am going with that design. It should be stronger than the two piece and it's less bolts and nuts fro assembly. The other improvment is the new leg/deck piece. Previously I had printed legs for it and thought well it needs somewhere to put the electronics. I of course designed a really elaborate piece that wrapped around the legs and such and then realized the whole thing could be much simpler and it's probably more stable the way I have done it now.

                  So I am still tweaking the design but all for the better I think. I cannot print the new frame or deck until I replace that bed film but I still have spools and spool mounts to crank out which I can do on the side of the bed.

                  Here is a shot of the components as I have then now. Notice the wire guide on the support rods, I think that is a nice touch ;-)

                  Click image for larger version

Name:	BZ-Blowout.JPG
Views:	1
Size:	36.2 KB
ID:	49451

                  Comment


                  • #24
                    way off topic but i think you'll get it. i all wanted to build a sg where the magnets are hung out off rotor so a coil-s can be placed on the inside of the plane of rotation and on the outside ,each magnet will pass two coils how you wind coils for a n-s event is important ,food 4 thought ,it x 2 the magnet passes i think. it x2 something for same rpm [x 2 drag ? ] i can see it in that pic , ok back to your regularly scheduled program
                    zz
                    Last edited by guyzzemf; 05-16-2017, 12:51 AM.

                    Comment


                    • #25
                      Bob,

                      my flashforge has a blue 3M sticky pad, that is TOO sticky. On the printers that I have that have glass plates I use dissapearing purple gluestick. I use the same product on the flashforge to make it LESS sticky. as soon as the bed cools, they pop right off.


                      Tom C


                      experimental Kits, chargers and solar trackers

                      Comment


                      • #26
                        Originally posted by guyzzemf View Post
                        way off topic but i think you'll get it. i all wanted to build a sg where the magnets are hung out off rotor so a coil-s can be placed on the inside of the plane of rotation and on the outside ,each magnet will pass two coils how you wind coils for a n-s event is important ,food 4 thought ,it x 2 the magnet passes i think. it x2 something for same rpm [x 2 drag ? ] i can see it in that pic , ok back to your regularly scheduled program
                        zz
                        Hey Guy I am with you on that. I have thought about what your describing or at least along those same lines. I wanted to make this machine in a way I am pretty certain it will work well since it's my first 3D project. It takes a long time to design and print this stuff up so I want something that will work for all the trouble but after this model is complete I do plan to go for some more exotic flavors.

                        @Tom

                        Thanks for the tip. I have thought about getting a glass top for it but I cannot find one in the correct size. With the new i3 MK2 they increase the bed size slightly so all of the old glass on the market is a little short. It could work but I don't want to give up any space just yet.

                        I have been printing coil holders and I think I have figured out a few things. I lowered the bed temp to 70 from 90 for one thing. Also I have been letting it cool all the way down after a print and they are coming off pretty easily. They do not have nearly the same surface area touching the bed so that could still be part of the problem with the wheel and large flat stuff like the frame and deck but when I messed up the film before the print was still pretty warm. I thought it would come off easier warm but now that I am letting things cool all the way I see that I may have been thinking of it backwards.

                        It's going to be a pain in the arse to fix the film on this thing but I have to do it to get bigger items printed. Such a shame since the printer is brand new. I will have to re-calibrate everything which I avoided by having them assemble it but I guess it's not that big of a deal. The main thing is getting the old film off and getting a new one on straight with no lumps.

                        Comment


                        • #27
                          thanks Bob we all seen the coil sandwich with 2 rotors it was just a thought to sandwich the magnet with coils guy
                          zz

                          Comment


                          • #28
                            Hello group,
                            This post is not about the machine itself but still a part of the project and I thought it might help someone down the road.

                            This is about repairing the damaged print bed surface.

                            Here is a picture of the old damaged bed with the giant tear in the middle:
                            Click image for larger version

Name:	BZ-damaged Bed.jpg
Views:	1
Size:	254.1 KB
ID:	49463

                            The first step I took was to run the pre heat function and then unload filliment and then stop heating. While the bed is still warm I pcked at the corner of the film with a spatula until I could get a grip on the film. Slowly I peeled back the old film until I had the whole thing removed. This leaves a lot of glue behind on the bed.

                            Here we see the bed still dirt with glue but the film removed. I took aluminum foil and made a protective covering around the bed so that in the next steps no glue or cleaner would get on the printer parts or belts:
                            Click image for larger version

Name:	BZ-film removed.jpg
Views:	1
Size:	436.5 KB
ID:	49464

                            Next I lay a paper towel over the print bed and pour D-Limeonene (can find on ebay or amazon) over the bed and towel to just enough to saturate and cover with aluminum foil to keep it from evaporating. I let this sit for about half an hour so that the glue starts to break down.

                            Click image for larger version

Name:	BZ-soak glue.jpg
Views:	1
Size:	325.3 KB
ID:	49465

                            This next step was repeated three times but this is a picture of the first. Once the glue is broken down I pull back the paper towel a little at a time and scrap the glue off with the spatula. You can see on the left an area not yet scraped. Notice the blob of glue on the right side on the foil cover. This is how much glue came off on the first pass. So as I said I soaked it again and did the same three times until all the glue had been removed.

                            Click image for larger version

Name:	BZ-glue strip.jpg
Views:	1
Size:	193.9 KB
ID:	49466

                            Finally after making sure the clean bed was free from any debris I attached the new film. Peel back only a half inch of the stcky backing and line it up properly. Then slowly press the film in place with the spatula working your way across the bed a little at a time, trying to ensure no bubbles on good adherence. Smoothing everything down as you go, maybe an inch at a time. I don't have pictures of that process but here is a shot of the new film with a first layer being printed.

                            Click image for larger version

Name:	BZ-new film.jpg
Views:	1
Size:	285.9 KB
ID:	49467

                            Comment


                            • #29
                              Originally posted by BobZilla View Post
                              Hello group,
                              This post is not about the machine itself but still a part of the project and I thought it might help someone down the road.

                              This is about repairing the damaged print bed surface.

                              Here is a picture of the old damaged bed with the giant tear in the middle:
                              [ATTACH=CONFIG]6269[/ATTACH]

                              The first step I took was to run the pre heat function and then unload filliment and then stop heating. While the bed is still warm I pcked at the corner of the film with a spatula until I could get a grip on the film. Slowly I peeled back the old film until I had the whole thing removed. This leaves a lot of glue behind on the bed.

                              Here we see the bed still dirt with glue but the film removed. I took aluminum foil and made a protective covering around the bed so that in the next steps no glue or cleaner would get on the printer parts or belts:
                              [ATTACH=CONFIG]6270[/ATTACH]

                              Next I lay a paper towel over the print bed and pour D-Limeonene (can find on ebay or amazon) over the bed and towel to just enough to saturate and cover with aluminum foil to keep it from evaporating. I let this sit for about half an hour so that the glue starts to break down.

                              [ATTACH=CONFIG]6271[/ATTACH]

                              This next step was repeated three times but this is a picture of the first. Once the glue is broken down I pull back the paper towel a little at a time and scrap the glue off with the spatula. You can see on the left an area not yet scraped. Notice the blob of glue on the right side on the foil cover. This is how much glue came off on the first pass. So as I said I soaked it again and did the same three times until all the glue had been removed.

                              [ATTACH=CONFIG]6272[/ATTACH]

                              Finally after making sure the clean bed was free from any debris I attached the new film. Peel back only a half inch of the stcky backing and line it up properly. Then slowly press the film in place with the spatula working your way across the bed a little at a time, trying to ensure no bubbles on good adherence. Smoothing everything down as you go, maybe an inch at a time. I don't have pictures of that process but here is a shot of the new film with a first layer being printed.

                              [ATTACH=CONFIG]6273[/ATTACH]
                              What's the advantage of using film?

                              Comment


                              • #30
                                Patrick,
                                As you know I am very novice when it comes to the 3D printing stuff but here is what I know. Original models of the Prusa I3 used glass beds and recommended various techniques for bed preparation, glue sticks, hairsprays, abs Juice and such. You can find a lot of people talking about that kind of thing in forums where the threads are a bit older. Now by the time I ordered my Prusa they had officially switched over to "ULtem PEI" sheets on their beds, which is what I am using here. The advantages are supposed to be that you need no surface prep other than to wipe the sheet down with either alcohol or window cleaner. It is supposed to make a good surface bond for PLA, ABS, PETG and many other material types without any additional surface prep. I will say that I damaged my original one because of too much stick but I also didn't know what I was doing and didn't really let things cool after the print. I probably should have known better than to keep pulling and prying at the part as I did. Now I understand to let it cool and if there is still a sticking issue you can take some dental floss and run under the print to to separate it.

                                Generally speaking I have not had issues with the surface being to sticky, most everything I have done comes right off and I used ABS and PETG, also a small PLA part, all came out fine so I think if used properly you do get a nice adhesion for the first layer and a part that will come off at the end pretty easily.

                                I mostly wanted to re-do the film on mine because that is how it shipped and I just wanted to fix my mistake. I think it does say a lot though that at Prusa, they used to use glass but now prefer this film. They run a factory of printers cranking out parts all day long so they have a lot of experience to go on. Anyway search youtube a bit for PEI print bed or whatever and you can see what others say.

                                You can get this stuff in various thickness also. The sheet I put on mine is a 3m but I have seen really thick ones too. Some people do not glue it down and just clip a sheet on like you would with a glass bed, you would have to adjust your Z to offset it.
                                Last edited by BobZilla; 05-20-2017, 02:31 PM.

                                Comment

                                Working...
                                X